지금까지는 컴포넌트를 만들고 그 컴포넌트에게 데이터를 넘겨주지 않고 그대로 렌더링만 했었다.
오늘은 컴포넌트가 사용할 인자를 넘겨주는 방법에 대해서 알아보았다.
1. 컴포넌트에서 사용할 인자 지정해주기
[props.js]
const root = document.querySelector("#root");
const App = () => {
return (
<div>
<Btn test = 'This is Test'/>
</div>
);
};
ReactDOM.render(<App />, root);
2. 컴포넌트에서 인자 받아오기
[props.js]
const Btn = (props) => {
console.log(props)
return (
<button></button>
)
}
이렇게 첫 번째 인자로 데이터를 받아올 수 있다.
props를 콘솔에 찍어보면

넘겨준 test의 값을 볼 수 있다.
컴포넌트에서 데이터를 받을 때는 첫 번째 변수에 모든 데이터가 다 담겨져있다.
const App = () => {
return (
<div>
<Btn test = 'This is Test' test2 = 'This is Test2'/>
</div>
);
};
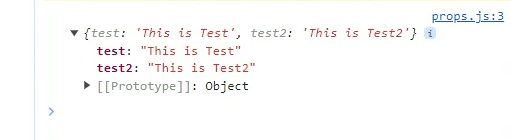
이렇게 test와 test2라는 2개의 데이터를 넘겨줬을 경우에는 아래와 같이 로그가 찍힌다.
이렇게 받은 데이터를 아래와 같이 사용할 수 있다.
const Btn = (props) => {
console.log(props)
return (
<button>{props.test}</button>
)
}
3. props 간결하게 사용하기
[props.js]
const root = document.querySelector("#root");
const Btn = ({test}) => {
return (
<button>{test}</button>
)
}
const App = () => {
return (
<div>
<Btn test = 'This is Test'/>
</div>
);
};
ReactDOM.render(<App />, root);
2-1 . App 에서 Btn컴포넌트를 사용할 때 test라는 인자를 넘겨주고 있다.
2-2. const Btn = ({test}) => { 이 부분에서 {test}를 통해서 App에서 넘겨준 데이터를 전달받는다.
2-3. const Btn = ({test}) => { 이 코드는const Btn = (props.test) => { 와 같은 코드다.
여러 데이터를 받았을 경우 같은 방법으로 아래와 같이 사용할 수 있다.
const Btn = ({test, test2}) => {
return (
<div>
<button>{test}</button>
<button>{test2}</button>
</div>
)
}

'JS > React' 카테고리의 다른 글
| React 공식문서 보기 - 3 (Component, props) (0) | 2024.03.14 |
|---|---|
| React 공식문서 보기 - 2 (JSX, 엘리먼트 렌더링) (0) | 2024.03.13 |
| React 공식문서 보기 - 1 (React 앱 만들기, Hello World) (0) | 2024.03.12 |
| React에서 useState사용하기 (1) | 2024.01.07 |
| React에서 createElement 사용하기 (0) | 2024.01.04 |


